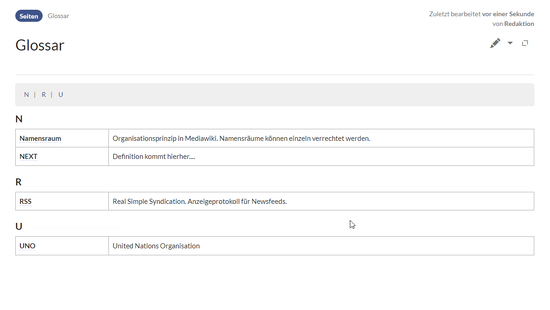
Using Wikitext syntax, you can create a glossary in your wiki (using the pre-installed extension Lingo). If a term appears on a wiki page, the definition is displayed via mouse hover.
Creating a Glossary
By default, the glossary page in an English-language wiki is called "Terminology".
To create the glossary:
- Create the "Terminology" page in the main namespace if it doesn't already exist.
- Enter the term and the corresponding term definition in the page's source code.
- Save the page.
Characteristics of a term:
- A term can display multiple definitions (see example AA)
- A term definition can contain further links (see example Travel Advisory)
;FTP
:File Transfer Protocol

;AAAAA
:American Association Against Acronym Abuse

;ACK
:Acknowledge
:Acklington railway station

;U.S.A.
;USA
:United States of America

Pull in more terminology from elsewhere:
{{:MoreTerminology}}
Hide glossary definition
If you don't want to display term definitions on a page, add the directive __NOGLOSSARY__ anywhere in the source code of this article.
In some cases, it may be necessary to exclude only parts of a page. This can be achieved by enclosing this part in an HTML element and specifying class="noglossary":
<span class="noglossary">No definition is displayed in this body text within a paragraph</span>

<div class="noglossary">No definition is displayed in this page section</div>
As an abbreviation for <span class="noglossary">, you can simply use the tag <noglossary>:
<noglossary>No definition is displayed in this body text within a paragraph</noglossary>
Display as a table with table of contents as jump links

To format the glossary as Table with links to the alphabetical entries:
- Copy the following formatting instructions to the end of the
MediaWiki:Common.csspage and save the page:/*Format glossary as a table */ #glossary h2 {font-size:1.4em; margin:0} #glossary dl { border: 1px solid #d8d8d9; display: grid; grid-template-columns: 200px 1fr; } #glossary dt, #glossary dd { border-bottom: 1px solid #aeaeae; padding: 8px; margin:0; } #glossary dt:last-of-type, #glossary dd:last-of-type { border-bottom: none; } #glossary dt{ font-weight: bold; grid column: 1; } #glossary dd { border-left: 1px solid #aeaeae; margin-left: 0; grid column: 2; } /* Show TOC on the glossary page as jump links.*/ .page glossary .tocnumber {display:none} /*hide numbering if set*/ .page glossary .toctext {padding-left:10px;} /*adds left-padding if no numbers are shown*/ .page glossary .toctitle {display:none} /*hide title if set*/ .page glossary #toc {background:#efefef} .page glossary ul > li.toclevel-1 {display:inline-block} .page Glossary ul ul {display:none} .page glossary ul > li.toclevel-1:after {content:'|'; padding-left:10px} .page glossary ul > li.toclevel-1:last-child:after {content:''; padding-left:10px} .page-Glossary .toc {width:100%;}
- Insert a <div id="glossary"> tag as a container in the source code of the ''Glossary'' page. This must be closed at the end of the page as
</div>. - Insert the glossary entries between them.
- Enter the corresponding letter as a heading at the beginning of each alphabetical section.
- Set the Force Table of Contents setting in the page options.
- Save the page.
The source code of the glossary page should ultimately look like this:
<div id="glossar">
== N ==

; Namespace
: Organizational principle in MediaWiki. Namespaces can be assigned individual permissions.

; NMV
: Neubaumietenverordnung

== R ==

; RSS
: Real Simple Syndication. Display protocol for news feeds.
</div>