No edit summary |
No edit summary |
||
| Line 52: | Line 52: | ||
Add the following rules to ''MediaWiki:Common.css'' | Add the following rules to ''MediaWiki:Common.css'' | ||
<syntaxhighlight language="css"> | <syntaxhighlight language="css" lang="css"> | ||
/*Drawio png - do not auto-resize preview images when links are added directly to the shapes */ | /*Drawio png - do not auto-resize preview images when links are added directly to the shapes */ | ||
div[id*=drawio-img-box] { | div[id*=drawio-img-box] { | ||
| Line 69: | Line 69: | ||
To apply this styling to only some Drawio images, you could add a wrapper to these images in source editing mode. For example: | To apply this styling to only some Drawio images, you could add a wrapper to these images in source editing mode. For example: | ||
<syntaxhighlight language="text"> | <syntaxhighlight language="text" lang="css"> | ||
<div class="drawio-linked"> | <div class="drawio-linked"> | ||
<drawio filename="processmap" alt="Processmap showing the management, core, and supporting processes "> | <drawio filename="processmap" alt="Processmap showing the management, core, and supporting processes "> | ||
| Line 78: | Line 78: | ||
In this case, do not add the above styles to your ''Common.css'', but use these rules instead: | In this case, do not add the above styles to your ''Common.css'', but use these rules instead: | ||
<syntaxhighlight language="css"> | <syntaxhighlight language="css" lang="css"> | ||
/*Drawio png - do not auto-resize drawio diagrams that are wrapped in a container with class drawio-linked */ | /*Drawio png - do not auto-resize drawio diagrams that are wrapped in a container with class drawio-linked */ | ||
.drawio-linked { | .drawio-linked { | ||
| Line 99: | Line 99: | ||
It is not recommended to maintain Drawio diagrams in table cells since the editing experience and the display in PDF documents can cause issues. An alternative is to Create the Drawio file on a separate page and then insert the image file with proper dimensions in any table cell in the wiki. If you decide to create Drawio files directly in a table cell, you can control the sizing in PDF exports by adding the following CSS to MediaWiki:Common.css: | It is not recommended to maintain Drawio diagrams in table cells since the editing experience and the display in PDF documents can cause issues. An alternative is to Create the Drawio file on a separate page and then insert the image file with proper dimensions in any table cell in the wiki. If you decide to create Drawio files directly in a table cell, you can control the sizing in PDF exports by adding the following CSS to MediaWiki:Common.css: | ||
<syntaxhighlight lang="css"> | <syntaxhighlight lang="css">/** ERM42590*/ | ||
/** ERM42590*/ | |||
.pdfcreator-type-page .drawio-table-test img { | .pdfcreator-type-page .drawio-table-test img { | ||
max-width: 10cm !important; | max-width: 10cm !important; | ||
} | }</syntaxhighlight> | ||
</syntaxhighlight> | |||
== Import of existing diagrams == | == Import of existing diagrams == | ||
Latest revision as of 16:10, 26 February 2026
Drawio offers extensive drawing possibilities for flowcharts, infographics and other visualizations on a wiki page. Descriptive graphics like process chains or decision trees can be constructed directly on a wiki page.
Embedding the Drawio editor
To insert a drawing in the visual editor:
- Create or choose a page where you want to insert a drawing.
- Open Content droplet menu from the editor toolbar.
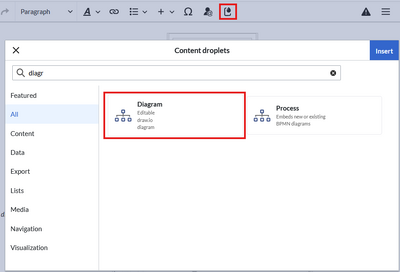
Diagram Content Droplet - Choose diagram from the list of content droplets.
- Click Insert. This opens a dialog box. The following properties can be set:
- Name: Name of the drawio diagram is used for the image name that stores the diagram in the wiki.
- Edit mode v5.2+: Fullscreen view opens the drawio editor in the entire browser window, Page view shows the drawio editor in the page content area.
- Image description: Alternative image text for screenreaders. It is not displayed on the page in view mode.
- Image alignment: Horizontal alignment of the diagram in the page content area.
- Click Insert. This inserts the
<drawio>-tag in your page.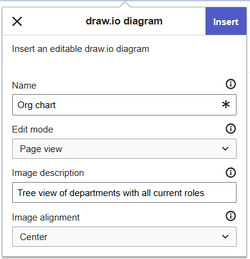
Drawio "insert"-dialog window - Save the page.


The Drawio editor is now available on the page.
![Drawio placeholder and [Edit] link](/wiki/File:DrawioEditor_placeholder.png)
Editing the diagram
To edit the diagram:
- Click Edit on the saved page next to the Drawio placeholder or your already saved diagram.
- Add any needed shapes to your diagram.
- Click Save in the Drawio window to save your drawing.
- Click Exit next to the Save button to close the editor.
Starting with BlueSpice v5.2.2+, the drawio editor is loaded with the "minimal" theme. A different theme can only be defined in source edit mode of the page. Supported themes are: minimal, classic, dark:
<drawio filename="Org chart" editmode="inline" theme="classic" alignment="center" alt="Tree view of all departments with current roles" />
Adding links to shapes
To add a link to a shape:
- Right-click to open the shape menu.
- Click Edit Link.

Shape menu - Provide the path to the page.
For internal wiki pages, the path usually starts with/wiki/, for example:/wiki/Manual:Extension/DrawioEditor.
Note: The displayed dropdown menu to select pages currently has no function in BlueSpice. - Click Apply.
- Repeat steps 1-4 for other shapes in the diagram.
- Click Save.
- Click Exit to close the editor.

If you don't see the changes yet, click F5 on your keyboard to refresh the page.
Remove auto-resizing auf Drawio images (PNG only)
The following information only applies to Drawio diagrams that are embedded as PNG. -v5.1
By default, drawio images are resized to always fit into the content area.
Since the links are implemented as map coordinates, the png image cannot be resized without breaking the link boundaries. To avoid this, you can disable automatic resizing of your drawio images with the following css.Add the following rules to MediaWiki:Common.css
/*Drawio png - do not auto-resize preview images when links are added directly to the shapes */
div[id*=drawio-img-box] {
    overflow-x:scroll
}

/*Drawio png - do not auto-resize preview images when links are created as image maps from file description page */
div[id*=drawio-img-box] img {
    height: initial;
    max-width: initial;
    width: initial;
}
This will remove the auto-resizing behavior from all Drawio preview images.
To apply this styling to only some Drawio images, you could add a wrapper to these images in source editing mode. For example:
<div class="drawio-linked">
<drawio filename="processmap" alt="Processmap showing the management, core, and supporting processes ">
</drawio>
</div>
In this case, do not add the above styles to your Common.css, but use these rules instead:
/*Drawio png - do not auto-resize drawio diagrams that are wrapped in a container with class drawio-linked */
.drawio-linked {
    overflow-x:scroll
}

.drawio-linked img {
    height: initial!important;
    max-width: initial!important;
    width: initial!important;
}
PNG and SVG Format
Up to BlueSpice 5.1, Drawio diagrams were always saved and previewed in PNG format.
Starting with BlueSpice v5.1.1+, newly created diagrams are saved and previewed in SVG format. Along with the diagram, a "Details" link to the versioning page is also generated.
Drawio diagrams in table cells
It is not recommended to maintain Drawio diagrams in table cells since the editing experience and the display in PDF documents can cause issues. An alternative is to Create the Drawio file on a separate page and then insert the image file with proper dimensions in any table cell in the wiki. If you decide to create Drawio files directly in a table cell, you can control the sizing in PDF exports by adding the following CSS to MediaWiki:Common.css:
/** ERM42590*/
.pdfcreator-type-page .drawio-table-test img {
	max-width: 10cm !important;
}
Import of existing diagrams
Visio diagrams

You can import files with the extension .vsdx directly into the Drawio editor and edit them further. To do this, create a diagram on a wiki page. In the Drawio editor, choose File> Import From> Device. You can then edit the imported diagram.
Configuration
Wiki admins can configure the following settings in the Configuration manager:
Available starting at version v5.1.4+.
- Backend URL: Allows to change the Drawio editor to an external URL. The local default URL is
https://<wikidomain>/_diagram/.
- Edit Mode: The default setting for the Drawio tag included on pages. This setting can be overridden for each diagram on the wiki page.
- Page view: Displays the Drawio editor in the content area of the wiki page.
- Fullscreen view: When the Drawio editor is opened, the wiki interface is completely hidden.