No edit summary Tag: 2017 source edit |
No edit summary |
||
| Line 5: | Line 5: | ||
To change the table layout, we can add some styling information to the template. | To change the table layout, we can add some styling information to the template. | ||
==Adjusting the template styling== | ==Adjusting the template styling (optional)== | ||
| Line 13: | Line 13: | ||
<div class="steps"><ol> | <div class="steps"><ol> | ||
<li> | <li>Edit the page ''Template:Customer data'' in source editing mode. Add the tag <code><nowiki><templatestyles src="Customer data/styles.css /></nowiki></code>and an additional class name to the class attribute of the table. In this example we, add the class name "mysmwtable":[[File:smw template class name.png|alt=source view of the customer data template with the new class name added|center|thumb|750x750px|Add a template class name]]</li> | ||
<li>Create the page ''Template:Customer data/styles.css''. | |||
</li> | </li> | ||
<li>To achieve the shown table styling, add the following code to the new ''styles.css''. | <li>To achieve the shown table styling, add the following code to the new ''styles.css''. | ||
<pre> | <pre>table.mysmwtable { | ||
table.mysmwtable { | |||
width:100%; /*width of the box/ | width:100%; /*width of the box/ | ||
margin: 0 0 2em 0; /*cell padding*/ | margin: 0 0 2em 0; /*cell padding*/ | ||
| Line 39: | Line 39: | ||
form.createbox table.formtable th { | form.createbox table.formtable th { | ||
padding:10px 0; /*distance between form fields*/ | padding:10px 0; /*distance between form fields*/ | ||
} | }</pre>[[File:Manual:Vorlage-Stil-css-EN.png|alt=Create a custom table style|center|thumb|650x650px|Create a custom table style]]<br />'''Save''' the page. | ||
</pre>[[File:Manual:Vorlage-Stil-css-EN.png|alt=Create a custom table style|center|thumb|650x650px|Create a custom table style]]<br />'''Save''' the page. | |||
</li> | </li> | ||
</ol> | </ol> | ||
<br />Now you can see the new table styling | <br />Now you can see the new table styling. | ||
As a variation, you can also define the background color of the table cells. For example, you can create white cell backgrounds. Change the following lines in your ''styles.css'':<br /><syntaxhighlight lang="css"> | As a variation, you can also define the background color of the table cells. For example, you can create white cell backgrounds. Change the following lines in your ''styles.css'':<br /><syntaxhighlight lang="css"> | ||
| Line 66: | Line 53: | ||
background-color: white; /*Hintergrundfarbe der Wertespalte*/ | background-color: white; /*Hintergrundfarbe der Wertespalte*/ | ||
} | } | ||
</syntaxhighlight> | </syntaxhighlight><br /> | ||
==Infobox== | ==Infobox== | ||
Revision as of 15:41, 15 July 2025
By default, a semantic template that was created with the page Special:CreateTemplate, is displayed in a basic table format. Each property/value pair is shown in a new table row.The table width adjusts to the table content.

To change the table layout, we can add some styling information to the template.
Adjusting the template styling (optional)
To format the table, we create a subpage to the template. It contains the custom template styles. In the following example, we create a variation of the original table with a width of 100%, left-aligned labels and more padding in the table cells.

- Edit the page Template:Customer data in source editing mode. Add the tag
<templatestyles src="Customer data/styles.css />and an additional class name to the class attribute of the table. In this example we, add the class name "mysmwtable":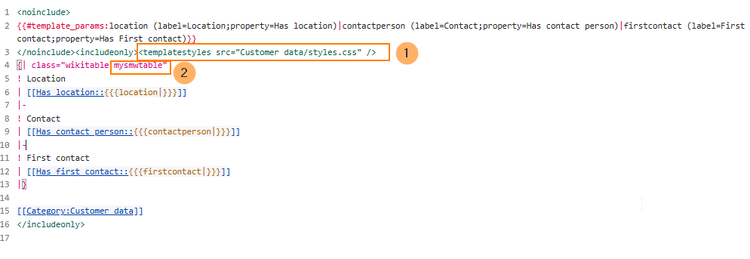
Add a template class name - Create the page Template:Customer data/styles.css.
- To achieve the shown table styling, add the following code to the new styles.css.
table.mysmwtable {
	width:100%; /*width of the box/
	margin: 0 0 2em 0; /*cell padding*/
	background-color: #f8f9fa; /*background color for the table*/
	color: #222; /*Textfarbe*/
	border: 1px solid #a2a9b1; /*border*/
	border-collapse: collapse; /*border*/
}
table.mysmwtable > tr > th, table.mysmwtable > * > tr > th {
	background-color: #eaecf0; /*background color of the label column*/
	text-align: left; /*alignment of the label column*/
	width:25%;/*width of the label column*/
}
table.mysmwtable > tr > td, table.mysmwtable > * > tr > td {
	background-color: #f8f9fa; /*background-color of the second column*/
}
table.mysmwtable > tr > th, table.mysmwtable > tr > td, table.mysmwtable > * > tr > th, table.mysmwtable > * > tr > td {
	border: 1px solid #a2a9b1; /*border around cells*/
	padding: 10px; /*cell padding*/
}
form.createbox table.formtable th {
	padding:10px 0; /*distance between form fields*/
}
Create a custom table style
Save the page.


Now you can see the new table styling.
table.mysmwtable > tr > th, table.mysmwtable > * > tr > th {
	background-color: white; /*background color of the label column*/
}
table.smwtable > tr > td, table.smwtable > * > tr > td {
	background-color: white; /*Hintergrundfarbe der Wertespalte*/
}
Infobox
You can also format the table as an infobox. An infobox is floating to the left or right of the text flow.

- Add the following css-code to the page Template:Customer_data/styles.css and save the template. Delete any previous styles for the class .mysmwtable to avoid any inheritance problems for the styles:
table.mysmwtable {
	float:right; /*right-aligned infobox*/
	width:300px; /*width of the box*/
	margin: 0 0 2em 2em; /*cell padding*/
	background-color: #f8f9fa; /*background color for the table*/
	color: #222; /*Textfarbe*/
	border: 1px solid #a2a9b1; /*border*/
	border-collapse: collapse; /*border*/
}
table.mysmwtable > tr > th, table.mysmwtable > * > tr > th {
	background-color: #eaecf0; /*background color of the label column*/
	text-align: left; /*alignment of the label column*/
}

table.mysmwtable > tr > th, table.mysmwtable > tr > td, table.mysmwtable > * > tr > th, table.mysmwtable > * > tr > td {
	border: 1px solid #a2a9b1; /*border around cells*/
	padding: 0.2em 0.4em; /*cell padding*/
}
form.createbox table.formtable th {
	padding:10px 0; /*distance between form fields*/
}