[[File:fe options.png|alt=inspector window with the classification options|center|thumb|650x650px|Classification options]]
[[File:fe options.png|alt=inspector window with the classification options|center|thumb|650x650px|Classification options]]
We should have a close look. This userTask has some additional properties besides the form reference (which was already explained in the initiation form):
*'''assigned user:''' The <code>assigned_user</code> property is mandatory, as the workflow engine must know which user to query. In this case, we use some wikitext magic to calculate the assigned user from the context. The value consists of a combination of a wikitext variable and a parserfunction (this particular parserfunction is defined by the Semantic MediaWiki extension, which can be seen as a dependency here). The <code><nowiki>{{#show}}</nowiki></code> parserfunction tries to get a username from a semantic property (in our example, the property ''Responsible'', that may or may not be set on the page the workflow is started on. If it does not find a proper information, it will fallback to <code>WikiSysop</code> (assuming that such a user exists on the wiki). The <code><nowiki>{{ROOTPAGENAME}}</nowiki></code> variable is just an easy way to strip the "User" namespace, if the looked up value was something like <code>User:JaneDoe</code> instead of just <code>JaneDoe</code>.
*'''due date:''' The <code>due_date</code> property is also mandatory. All user facing activities need a due date. If the running activity is overdue, the workflow engine will end the workflow. In this case, we implement a concept of "lay days", as we do not have an absolute due date, but calculate it from the time the activity gets started using the <code><nowiki>{{#time}}</nowiki></code> parserfunction.
*'''classification:''' The <code>classification</code> property is a random one. It must be specified, in order to allow the form to set it and the workflow context to access it. We could have provided a default value, but we want to keep it empty.
==== Creating the wiki page "Class B records"====
==== Creating the wiki page "Class B records"====
Since we tell the workflow to record any pages that are classified as Class B, we need to make sure that this page exists in the wiki. Therefore, we simply create the page Class B records and save it empty. Since we defined in the workflow definition that all Class B incidents will be Prepended to this page, it does not make sense to add any other content to this page.
Since we tell the workflow to record any pages that are classified as Class B, we need to make sure that this page exists in the wiki. Therefore, we simply create the page Class B records and save it empty. Since we defined in the workflow definition that all Class B incidents will be Prepended to this page, it does not make sense to add any other content to this page.
Revision as of 09:36, 18 July 2025
Workflows can be created directly in the wiki with the Workflow editor.
In addition to the built-in workflows, users can create their own workflows in the wiki. The functionality of the workflows is based on the currently implemented workflow elements (based on the XML standard BPMN). Note that not all elements of the BPMN standard are supported in the Workflows extension at this time.
Steps to create a custom workflow
To create a workflow:
Define the workflow with the necessary steps and activities.
Create a page with the extension .bpmn . Ideally, this page is created in the MediaWiki namespace, which is reserved for the more technical pages in the wiki.
Edit the page in Edit diagram mode.Edit menu
Add a start event, activities, gateways (optional) and an end event. The following BPMN-Elements are supported:
Events: start and end event
Gateways: currently only parallel gateways are possible
In addition, you can bind the workflow to a particular page revision. (This is necessary for approval workflows, for example).
Save the BPMN diagram.
Create a form page with the .form extension if you want to collect any data from the user during workflow execution.
Add a workflow trigger. The workflow is now available in the wiki.
Test the workflow. Ensure that:
The workflow is available to be started in the namespaces defined in the workflow trigger (if there are restrictions here).
The workflow is triggered.
The workflow is listed in the Workflows Overview page.
The assigned user received a task.
The workflow completes correctly in all possible scenarios (in case of gateways).
Example 1 (basic): Obtaining a signature on a page
Defining the workflow
Let's look at a simple workflow:
After completing a page (e.g., meeting minutes), the signature of the department head John Doe is required.
required workflow steps
We need a workflow definition with two workflow activities:
User feeback (request signature): John Doe receives a feedback task. A feedback task adds a banner to the page. To complete the task, John Doe provides his feedback (for example: "noted").Workflow Banner
Edit wiki page (add signature): After completing the feedback task, the workflow automatically adds John Doe's wiki signature to the page.Inserted signature
Creating the workflow
Click on the wiki's New button and enter the page name with the extension .bpmn, e.g. Signature.bpmn.Create page using the "New" button
ClickDone.
Open the page in edit mode. The diagram already shows the start activity.
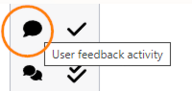
Add the activity User feedback.activity "User feedback"
Open the dialog box for the activity (via double-click) and enter the name of the activity (e.g., "request signature"),
Add the user name and an instruction (e.g., "Sign this page")dialog box for activity "User feedback"
Click on Save.
Connect the StartEvent with the activity User feedback.
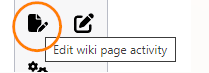
Add the activity Edit wiki page and connect it to the previous activity.Activity "Edit wiki page"
Open the dialog box for the activity (via double-click) and enter the name of the activity (e.g. "add signature" or "sign page"),
Specify the page on which the signature should be added. Normally this is the page on which the workflow is triggered. To do this, use the Magic word{{FULLPAGENAME}} as a placeholder.
Specify the user name for the signature. (Note: In the next example we will see how the user name can be entered via a form when triggering the workflow, but in this example we will enter the name directly in the workflow for simplicity, since the same person always signs.)
Enter four tildes as Content. This will automatically create the specified user's signature in the wiki.
Mark the change (i.e. the insertion of the signature on the page) as a minor revision (Minor revision) if you do not want it to trigger a notification or display as the last change on overview pages in the wiki.
SelectAppend as Edit mode. This will insert the signature at the end of the page.Dialog window for activity "Edit wiki page"
Click on Save.
Connect the activity User feedback with the activity Edit wiki page.
Add an EndEvent and connect it to the previous activity.EndEvent
Save the page.
The workflow should now look like this:
Finished workflow
The workflow can now be used in the wiki.
The next step is to activate the workflow in the wiki.
Creating the workflow trigger
So that the workflow can now be used on a page, we still need to create a trigger:
Click on Global Actions > Workflow Triggers.
Click on Add new trigger.
SelectManual as the type.Create a manual workflow trigger
Set up the workflow trigger:
Enter the name as you want it to appear in the workflow menu on the page.
Enter a short description as you want it to appear in the workflow menu on the page (optional).
Select the workflow Signature as the workflow to start.
Specify as a condition in which namespaces the workflow should be available (optional). If no condition is specified, the workflow is automatically available in all content namespaces.Trigger setup
Applying the workflow
The workflow goes through the following steps:
Start workflow: Users with editing rights in the wiki can now start the workflow to request a signature from J. Doe. To do this, the workflow is triggered, for example, on a protocol page using the corresponding menu item.Select workflowA start dialog appears. Since there is no form for entering data here, the dialog can be closed with Start.Start the workflowThe assigned user J. Doe receives an email and a task appears in his user menu in the wiki.
Execute workflow task: J. Doe checks the page and executes his assigned feedback task using the blue banner. It is possible that the banner does not display the name, but the name of a system message assigned to the workflow. You can create this in the wiki.Workflow Banner
Signature is added to the page: The wiki signature is automatically appended to the end of the page content.Inserted signature
Example 2 (advanced): Classification of a wiki page
Defining the workflow
Let's assume, we want to build a workflow, that asks for some classification of a wiki page.
Based on the classification of the document, it either sends an e-mail to a member of the legal team or it first appends a wiki page and then sends the e-mail to the legal team.
The described workflow consists of four activities and one gateway.
Classification workflow
Necessary workflow components
To create the workflow, the following steps are necessary:
Create the custom workflow definition: MediaWiki:Classification-workflow.bpmn
Create an initiation form that adds some information about the workflow before it sends the task: MediaWiki:ContentClassificationInit.form
Create a classification form that allows the assigned user to classify the document: MediaWiki:ContentClassificationRequest.form
Create the wiki pageClass B records that collects Class B incidents.
Add a workflowtrigger to the wiki that defines where and how to start the workflow.
Test the workflow.
Creating the custom workflow definition
First, let's create a page called MediaWiki:Classification-workflow.bpmn . It opens the Workflow editor.
Workflow editor
Add the following shapes to your diagram (hover over the icons in the toolbar to see the name of each BPMN element).
Connect each element with an arrow.
Click on each shape to enter the necessary information:
A Custom form to initiate the workflow.
Name:Initiation form
Form type:On-wiki form
From title:MediaWiki:ContentClassificationInit.form
Use as initializer:yes
Another Custom form for classifying the page on which the workflow runs.
Name:Classification form
Form type:On-wiki form
Form title:MediaWiki:ContentClassificationRequest.form
classificationClassification formWe should have a close look. This activity has some additional properties besides the form reference:
assigned user: The assigned_user property is mandatory, as the workflow engine must know which user to query. In this case, we use some wikitext magic to calculate the assigned user from the context. The value consists of a combination of a wikitext variable and a parserfunction (this particular parserfunction is defined by the Semantic MediaWiki extension, which can be seen as a dependency here). The {{#show}} parserfunction tries to get a username from a semantic property, that may or may not be set on the page the workflow is started on. If it does not find a proper information, it will fallback to TheBoss (assuming that such a user exists on the wiki). The {{ROOTPAGENAME}} variable is just an easy way to strip the "User" namespace, if the looked up value was something like User:JaneDoe instead of just JaneDoe.
due date: The due_date property is also mandatory. All user facing activities need a due date. If the running activity is overdue, the workflow engine will end the workflow. In this case, we implement a concept of "lay days", as we do not have an absolute due date, but calculate it from the time the activity gets started using the {{#time}} parserfunction.
classification: The classification property is a random one. It must be specified, in order to allow the form to set it and the workflow context to access it. We could have provided a default value, but we want to keep it empty.
A Gateway that processes the user's classification choice.
Name:Classificationform.classification (Note: The name has to match the name of the form and its property which has to be evaluated from the previous step).
Name of the connector to the Send mail activity: Class_A
Name of the connector to the Record Class B activity: Class_B
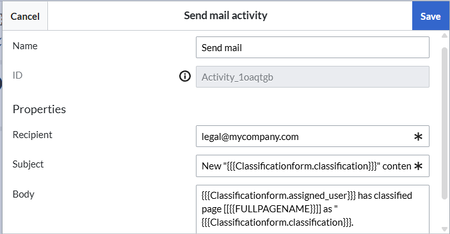
A Send mail activity after the "Class_A" classification choice.
Name: Send mail
Properties:
Recipient: legal@mycompany.com (replace with the actual email adress that should be notified)
Subject: New "{{{Classificationform.classification}}}" content: {{FULLPAGENAME}}
Body: {{{Classificationform.assigned_user}}} has classified page [[{{FULLPAGENAME}}]] as "{{{Classificationform.classification}}}".Send mail activity
An Edit wiki page activity after the "Class_B" classification choice. Connect it to the Send mail activity from step 5.
Name:Record Class B
Wiki page to edit:Class B records (title of the wiki page to which the content will be prepended)
User: {{ROOTPAGENAME:{{#show:{{FULLPAGENAME}}|?Responsible|link=none|default=WikiSysop}}}} (user that is shown in the version history of the wiki page that was appended.)
Content: *[[{{FULLPAGENAME}}]] was classified {{{Classificationform.classification}}} by [[Benutzer:{{{Classificationform.assigned_user}}}]] (text that is added to the wiki page)
Minor revision: You can leave the default setting or disable this setting. Minor revisions will usually not trigger notifications if wiki users have subscribed to "edit" events (see mediawiki.org for general info about minor edits).
Edit mode:Prepend (in contrast to "Append", the incidents will be shown on page Class B records in descending order),
Add the end event after the Send mail activity.
Save the diagram.
Creating the initiation form
The initiation form allows to interact with the user who starts the workflow. It explains what happens when the workflow is started and allows to add a comment to provide some context for the user task.
Just like the BPMN workflow definition, we also create this form in the MediaWiki namespace.
Worfklow initiation form
To create the initiation form:
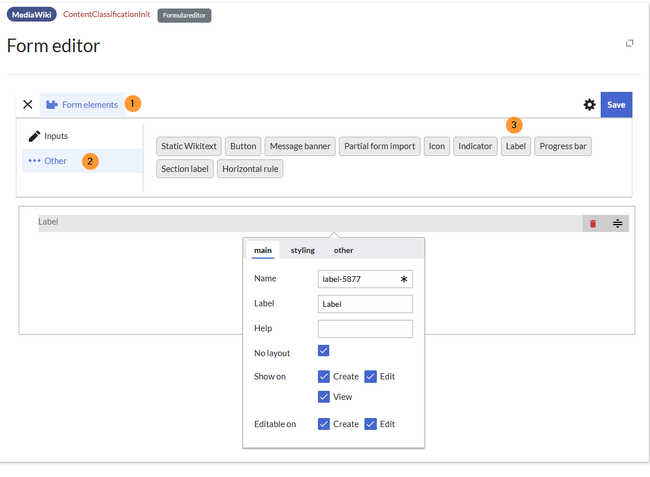
Create the page MediaWiki:ContentClassificationInit.form. The form editor opens.
ClickForm elements > ...Other and drag a Label element in the edit area.Workflow editor
Click anywhere in the Label row to open the field inspector. Add:
Name: intro
Label: Click "Start" to ask an expert for classification. You can leave a comment for the expert below.
Switch from ...Other to Inputs and add a Textarea. Drag it below the intro field. Add:
Name: comment
Label: Comment
Save the form.
Creating the classification form
Now we need a form that allows the assigned user to select a classification during workflow execution.
To create the classification form:
Create the page MediaWiki:ContentClassificationRequest.form
Select the Dropdown input type and drag it into the edit area.
Click anywhere in the Label row to open the field inspector. Add:
Name: classification
Label: ClassificationAdd classification
Switch to options in the field inspector dialog. Add:
Data: Class_A (the data name has to match the connector label of the gateway in the BPMN workflow definition).
Label: Class A
Click Add new in the options tab. Add:
Data: Class_B (the data name has to match the connector label of the gateway in the BPMN workflow definition).
Label: Class B
Save the form.
Classification options
Creating the wiki page "Class B records"
Since we tell the workflow to record any pages that are classified as Class B, we need to make sure that this page exists in the wiki. Therefore, we simply create the page Class B records and save it empty. Since we defined in the workflow definition that all Class B incidents will be Prepended to this page, it does not make sense to add any other content to this page.
We now have all the elements to start the workflow. We can now define the workflow trigger.
Creating the workflow trigger
For the workflow to appear in the wiki, we need to define a trigger:
ClickWorkflow triggers in the Global actions menu.
ClickAdd new trigger.
Select the option Manual from the dropdown menu.
ClickContinue.
Define the settings for the workflow trigger:
Name:Classification (Name that is displayed in the workflow selection menu)
Description:Classifies a document as Class A or Class B (Explanation of the function of this workflow)
Workflow to start:Classificiation-workflow
Initial data for the workflow (optional): Standard comment suggestion. You can leave this empty.
Conditions (optional): You can select, in which namespaces the workflow is displayed for selection. If no namespace is given, the workflow can be triggered in all namespaces.
ClickSave.
Your workflow is now ready to be tested.
Testing the workflow
You should test whether the following functionality is available:
The workflow can be started in the namespaces defined in the workflow trigger (if there are restrictions here).
The workflow is triggered.
The workflow is listed in the Workflows Overview page.